
Like what you're reading?
Get pinball news, analysis, and deep dives delivered to your inbox.
Get pinball news, analysis, and deep dives delivered to your inbox.
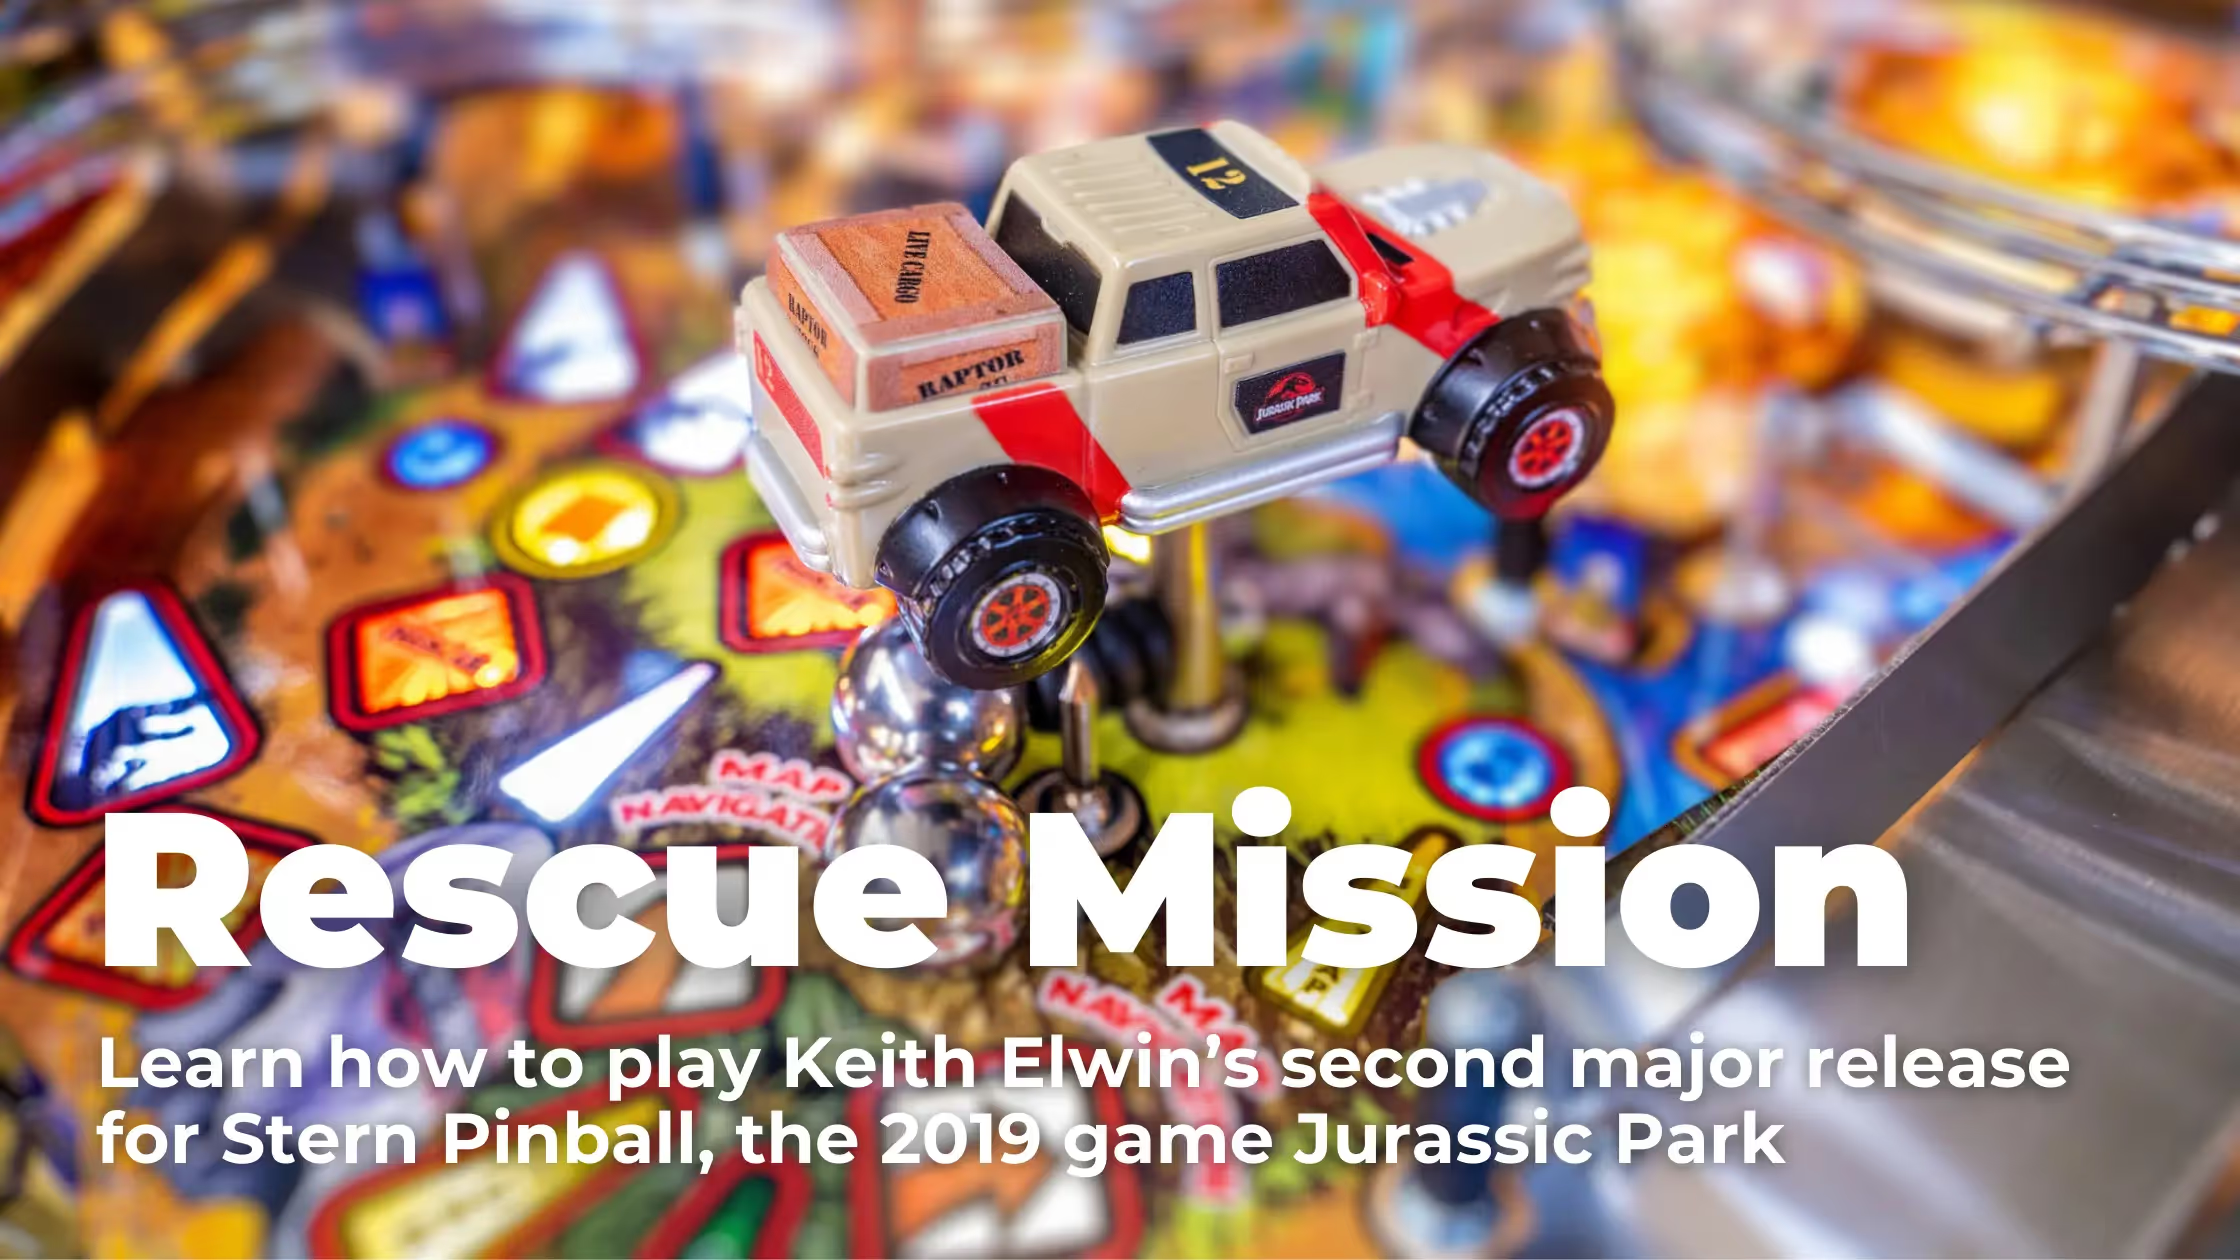
After the success of Iron Maiden in 2018, professional player-turned-Stern playfield designer Keith Elwin was assigned his next machine, a Jurassic Park table utilizing minimal assets from the film and instead telling an original story that took place during the film’s aftermath. This would be the third pinball machine based on the series after a Data East table (also called Jurassic Park) based on the film when it was brand new, and a SEGA table (Lost World) based on the film’s first sequel. Of the three tables, while I have a soft spot for the Data East table, the Stern table is widely loved and recognized as one of the best modern pinball machines.
For the longest time, while I liked the rules progression of Stern Jurassic Park, the layout never really clicked for me. But as of late I’ve gotten into this machine something fierce and want to provide as much knowledge as I can for people wanting to give this table a shot, especially seeing that it’s been used in more and more tournaments. Just remember, this table has a steep learning curve and can be very unforgiving, but Jurassic Park truly shines when it gets going.
Following the condemnation of Jurassic Park as a failed experiment, InGen led an evacuation attempt to rescue the park’s trapped workers and revived dinosaurs. The player takes part in this attempt, clearing out as many paddocks as possible while restoring power to the park and evading the clutches of the park’s resident dinosaurs, including a T-Rex out for revenge.
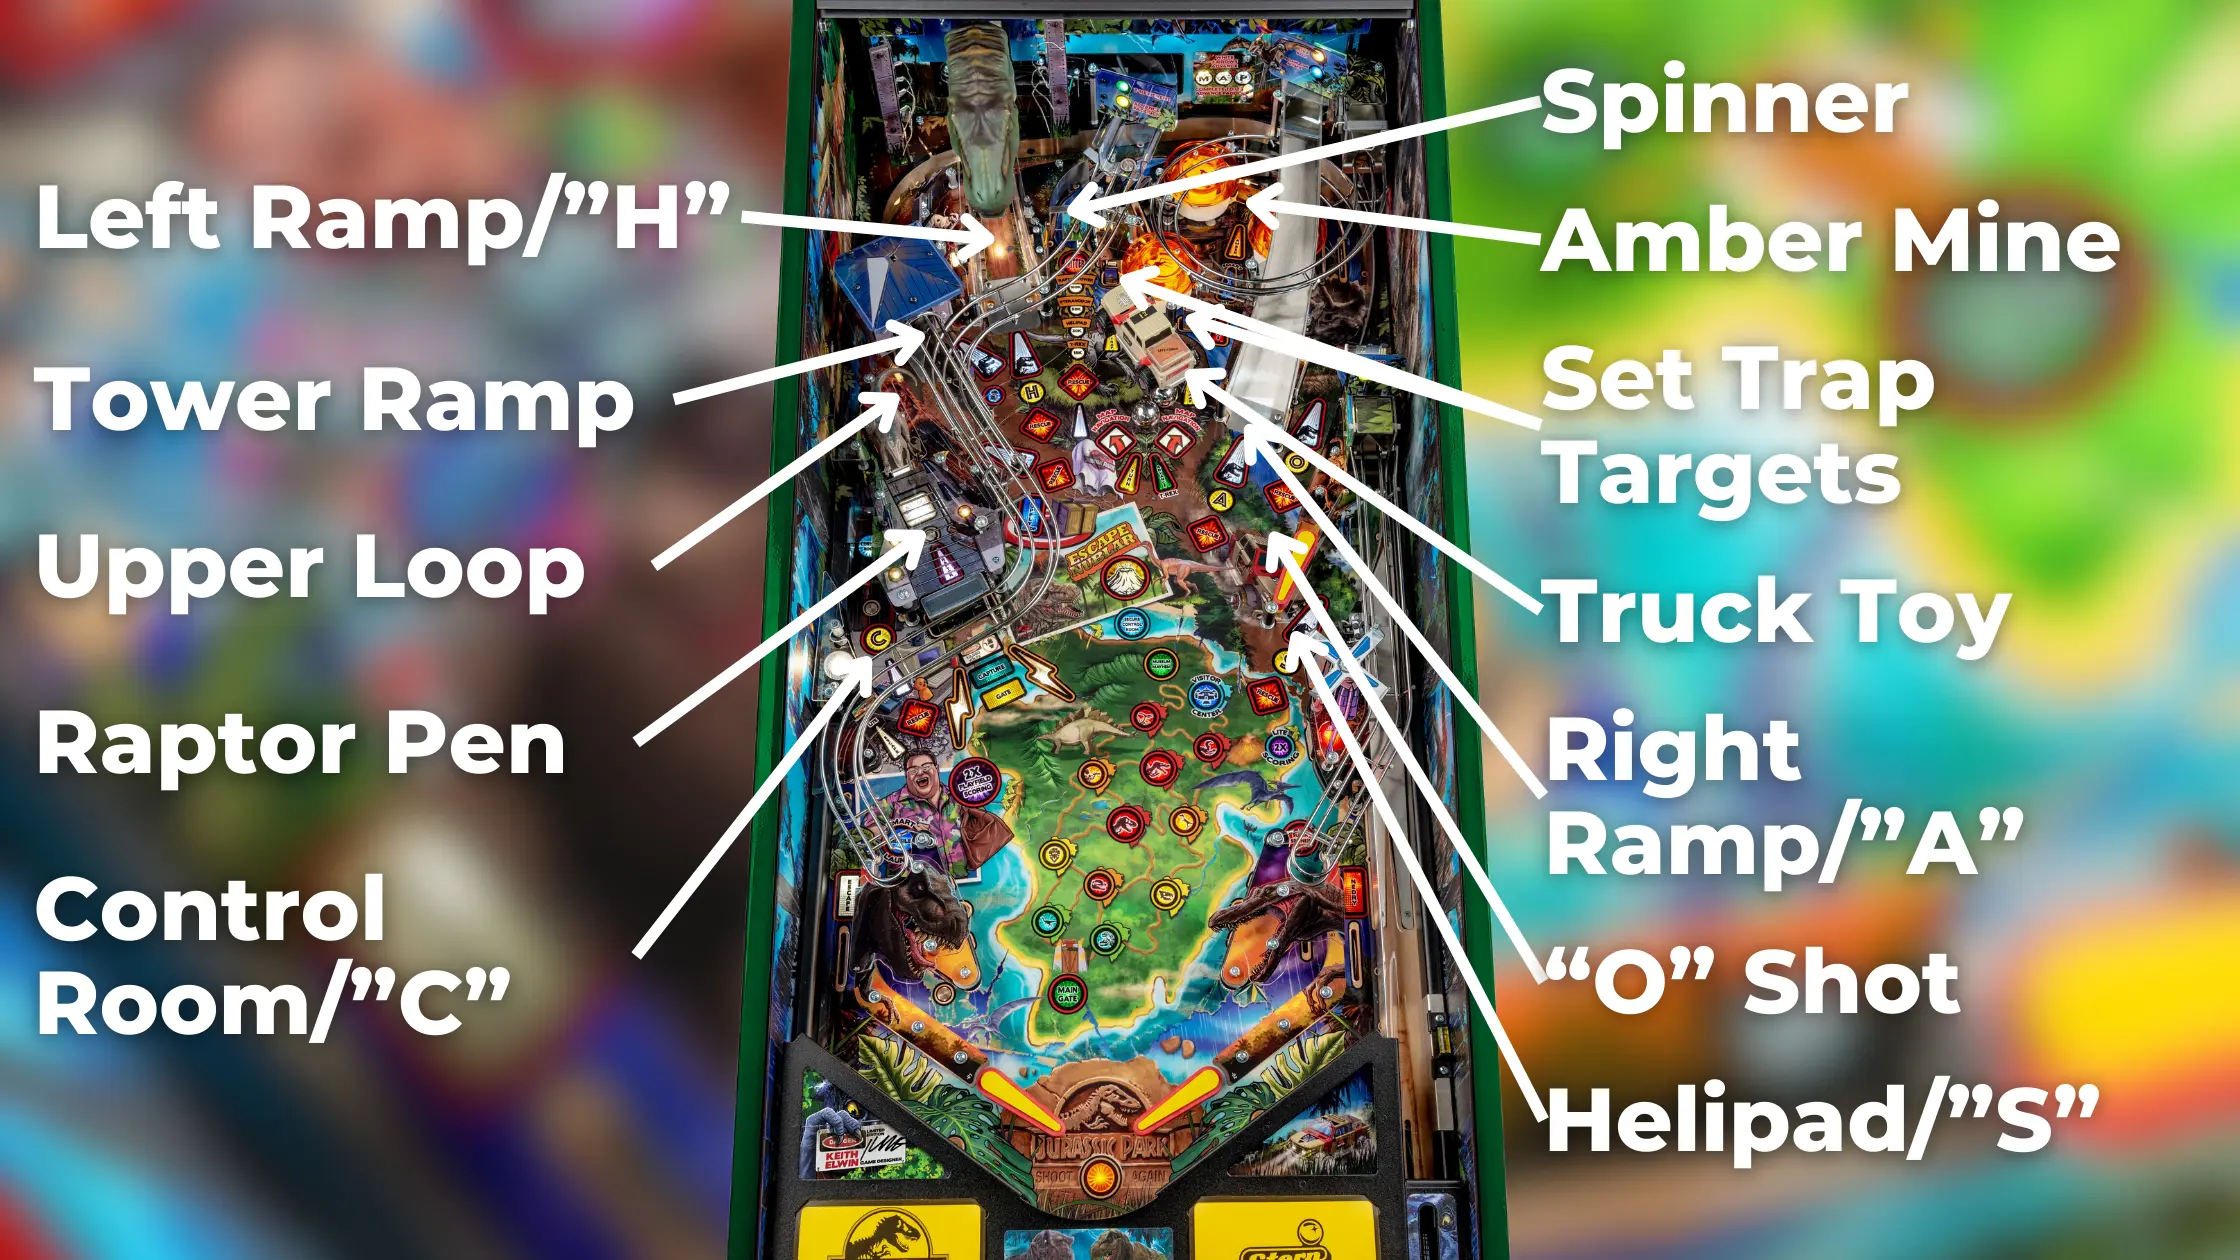
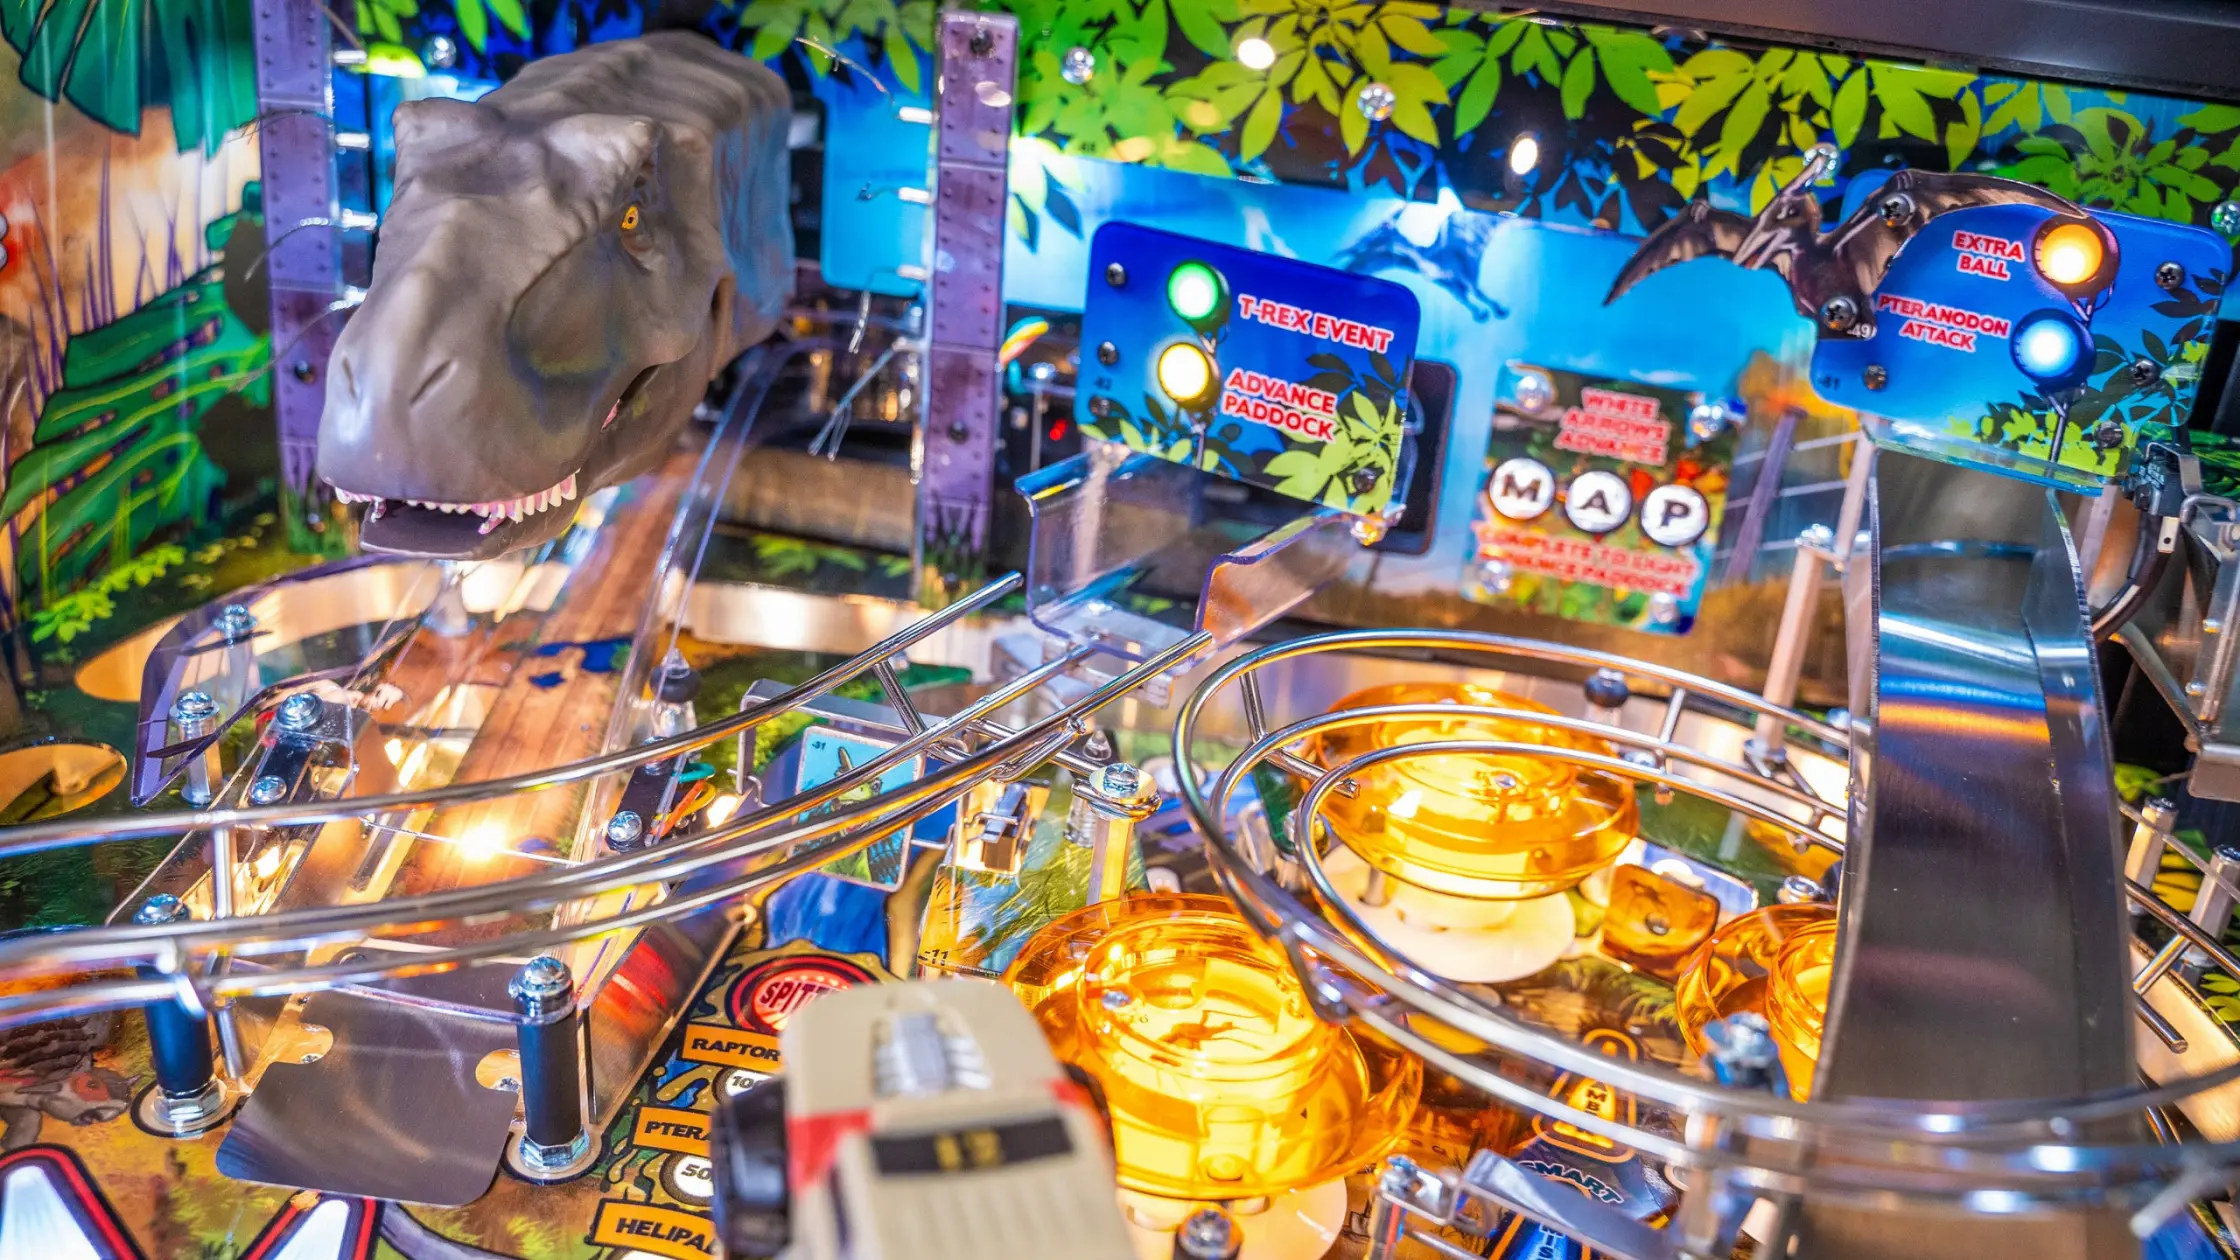
The layout of Stern’s Jurassic Park features a wide mix of shots close to and far from the flippers. Two of the closest shots are on the left side of the playfield: the “C” target, or control room shot, and the raptor pen targets. The control room shot is best hit from a cradle from the right flipper, but the raptor pen can be hit from either flipper. A shot to the direct center of the raptor pen is required to lock balls and start raptor tri-ball, and on some copies this difficult shot is best approached as a backhand from a left flipper cradle.
Above the raptor pen are two shots that can be hit from the upper flipper with precise timing, the upper loop and the tower ramp. Both shots are used prominently during control room modes and T-Rex events, and both shots count down towards awards; you can even combo into the tower ramp off the upper loop to advance to the tower ramp’s awards quicker. The best way to set up these upper flipper shots are by either hitting the spinner, or the amber mine target between the bumpers. The right ramp also sets up the upper flipper but sends the ball towards it at a very fast speed requiring quick reflexes.
Two shots players will need to master for game progression are thankfully right up the middle: the left ramp, and the spinner. The left ramp advances to the next paddock when lit and starts T-Rex events after the truck has been hit enough times – not to mention serving as a great “bailout shot” during multiballs or for transferring the ball between flippers. The spinner, meanwhile, is your best way to set up upper flipper shots and can score quite a few points if you hit a few ramps before nailing the spinner or have super spinner running. It can be hit reliably from either flipper but look out for potential drains from weak spinner shots!
The truck toy was designed to provide “kinetic satisfaction”, one of the top priorities for Keith Elwin in all his designs and impacts the game in many ways. Depending on which way the truck is facing, the player will advance to different paddocks, either smart missile or super spinner will be available at the inlanes, and the shot path of the “O” shot will change. The truck also advances the player towards T-Rex events (and is used prominently during those modes). Behind the truck are arguably the two most important targets in the game, the “set trap” targets. Indicated by flashing yellow lights, these targets are required to capture dinosaurs beyond the first paddock of a game, and your best bet will be to sneak past the truck shot and hit whichever target is flashing, ideally with backhand shots.
To the right of the truck is a secluded bumper area with a target between them, called the amber mine. Bumper hits increase the amber bonus over the course of the game, which can be collected at the amber mine target and multiplied after capturing certain dinosaurs. The amber bonus is also used to determine scoring during the four “amber modes” awarded from super supply drop: amber slings, ramps, targets, or pops. The amber mine target is also the shot required to collect the smart missile award when lit, but the truck will always be in a position that makes the smart missile shot quite difficult to hit.
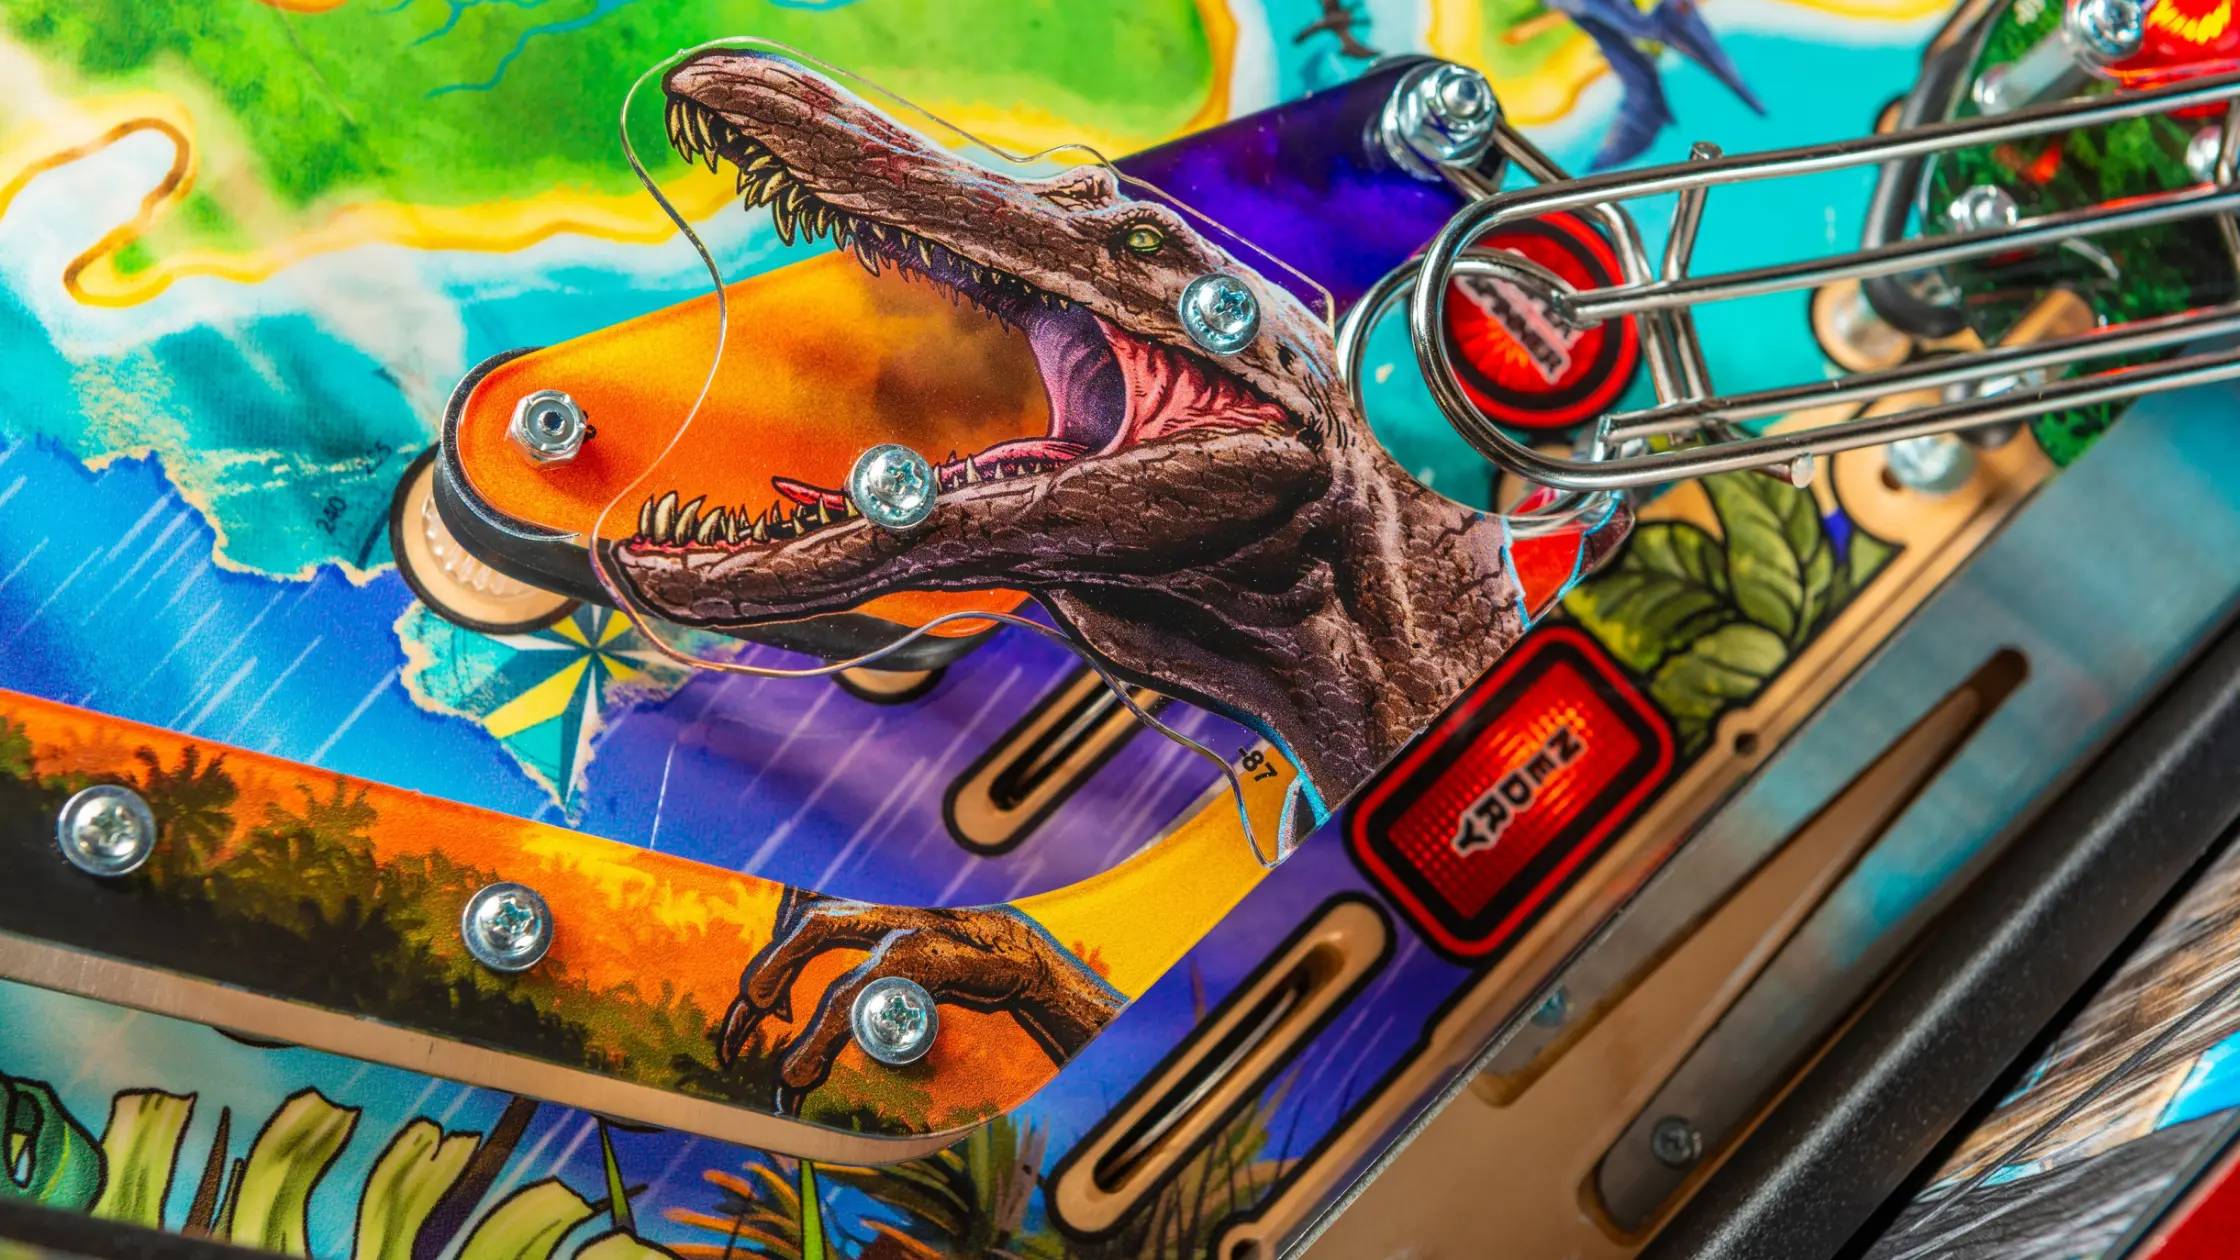
Two of the toughest shots in the game are on the right side of the playfield: the right ramp, and the “O” shot. The right ramp is positioned at an odd angle, but shots to it will eventually start a frenzy mode called pteranodon attack and send the ball to the upper flipper albeit at a very high speed. The “O” shot is arguably the tightest shot in the game and is best shot from a left flipper cradle. Try aiming the ball towards the light brown area of the Jurassic Park insignia above the flippers for the best chance of hitting the “O” shot.
Finally, the helipad shot is located on the far right of the game. The helipad is where all new balls are plunged, and mastery of this shot is required to advance through paddocks as dinosaurs can’t be captured without the help of a helicopter to detain them safely. Late flips from the left flipper are your best bet for hitting the helipad reliably. Weak helipad shots will bounce off a rubber at the shot’s entrance; use this as an opportunity to either dead flip (let the ball bounce off the left flipper) or catch the ball with the left flipper.
Also scattered throughout the table are several targets. One target at the very far left lights “escape” (the left outlane ball save) but must be lit first by rolling through a switch near the amber mine. The “set trap” targets and one more purple target that can be hit from the upper flipper light the “supply drop” mystery award, which advances to “super supply drop” with upper loop hits. Lastly is a small target below the helipad shot, which starts 2x scoring after a supply drop award has been scored, and advances towards lighting Nedry’s ball save at the right outlane.
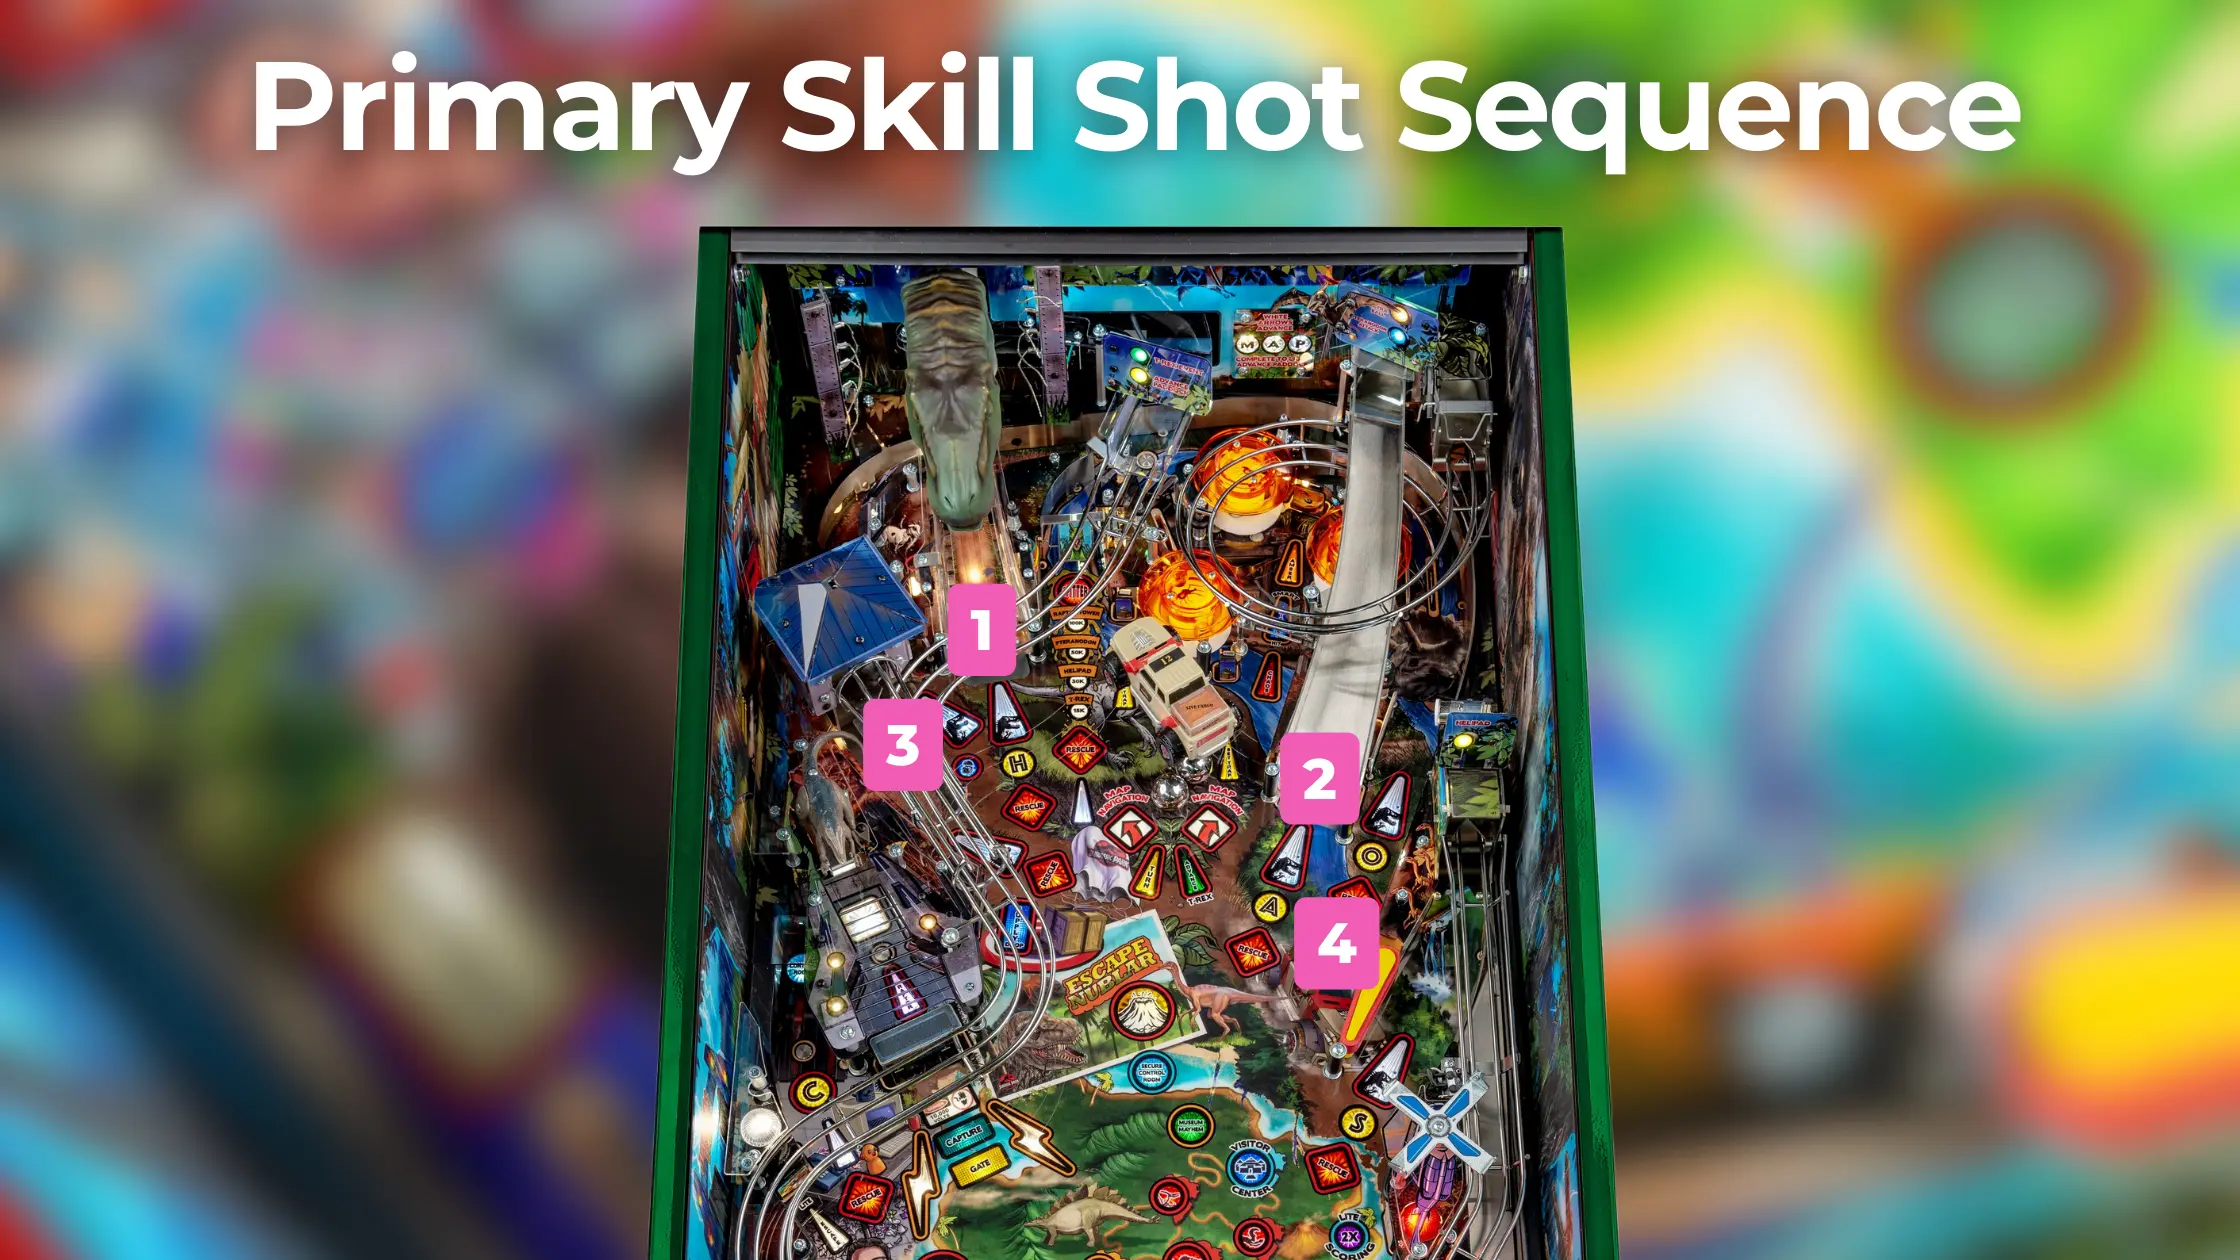
The skill shot on this table is a lot of fun and can net you some ball save time! The left ramp is the first skill shot, but you can then multiply the value (and earn more ball save time) by hitting the right ramp, followed by the tower ramp and finally the “O” shot. A great way to start off any ball.
Early in the game, however, I prefer ignoring the standard skill shot and instead short plunging, letting the ball bounce off the left flipper, and then hitting the “C” target on the fly. This scores a secret skill shot worth some points, but most importantly spots the “C” in CHAOS. I find Chaos Multiball to be worth going for and hitting the “C” as early as possible, especially with ball save on, increases my odds of getting there. There are also some other secret skill shots I won’t spoil here.
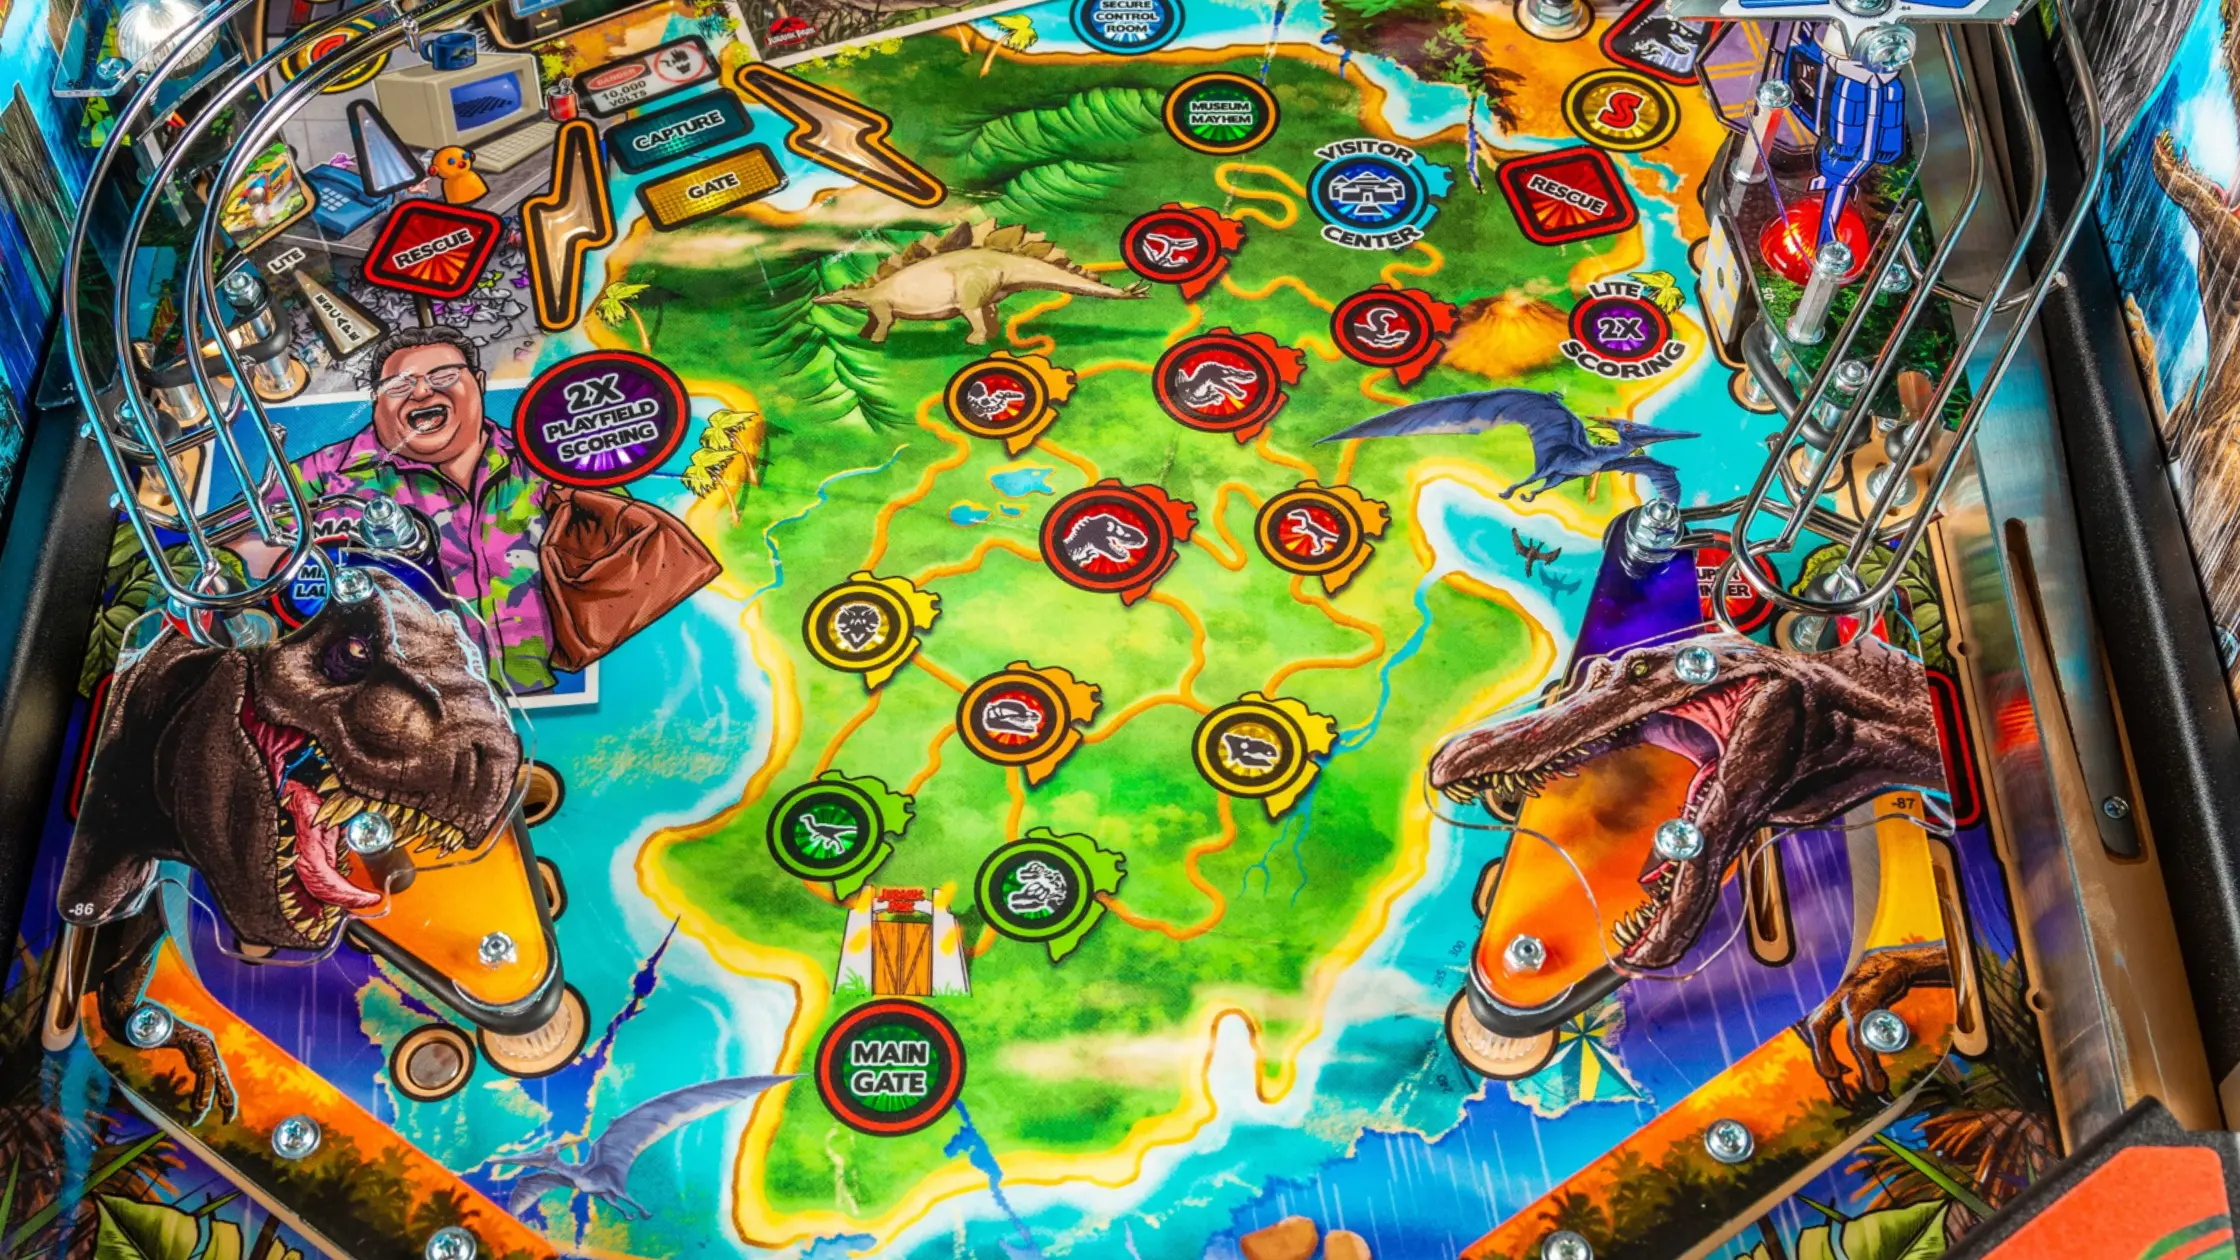
At the start of the game, the player starts out at the “main gate.” When they start their first paddock mode as described below, they will move to either the left side (Gallimimus) or right side (Brachiosaurus) of the map depending on which direction the truck toy is currently facing. Essentially, this means that by hitting the truck, the player is changing the path they take through the park’s paddocks.
The more difficult dinosaurs to capture are indicated by their colors. The edges of the path are linear in difficulty, but in the middle of the map are the two more difficult T-Rex and Spinosaurus paddocks, which are some of the toughest paddocks to complete but score some of the most beneficial perks when completed.
If I’m playing for score I’ll go for these central paddocks, but otherwise I prefer sticking to the edges of the map at all costs.
Hit the white arrows to spell MAP and light the left ramp for advance paddock; the first paddock only takes one white arrow but subsequent ones require three, and will appear on less and less shots over the course of the game. Starting the first paddock will give some lore for why the paddocks have fallen into disarray before releasing the ball; you can skip the setup by pressing both flippers.
The best way to describe paddock completion is to compare them to the colors on a traffic light: red, yellow, and green. First, you need to hit the red “rescue” shots. After hitting enough of those (the further in the game you get, the more you need to hit), you need to hit the flashing yellow shots; the first paddock only requires a single “set trap” target hit behind the truck, but later you will need to hit the helipad to fuel the helicopter. Finally, to capture the dinosaur, the flashing green / yellow shot must be hit before the helicopter runs out of fuel.
My usual approach is to rush through each paddock as quickly as possible by picking up the minimum number of rescues possible, and as soon as the “set trap” targets light, heading for those to begin capturing the dinosaur. More and more points are awarded for successfully rescuing employees without the dinosaur killing them, so it’s best to collect the other rescues lit from paddocks after the dinosaur has been captured.
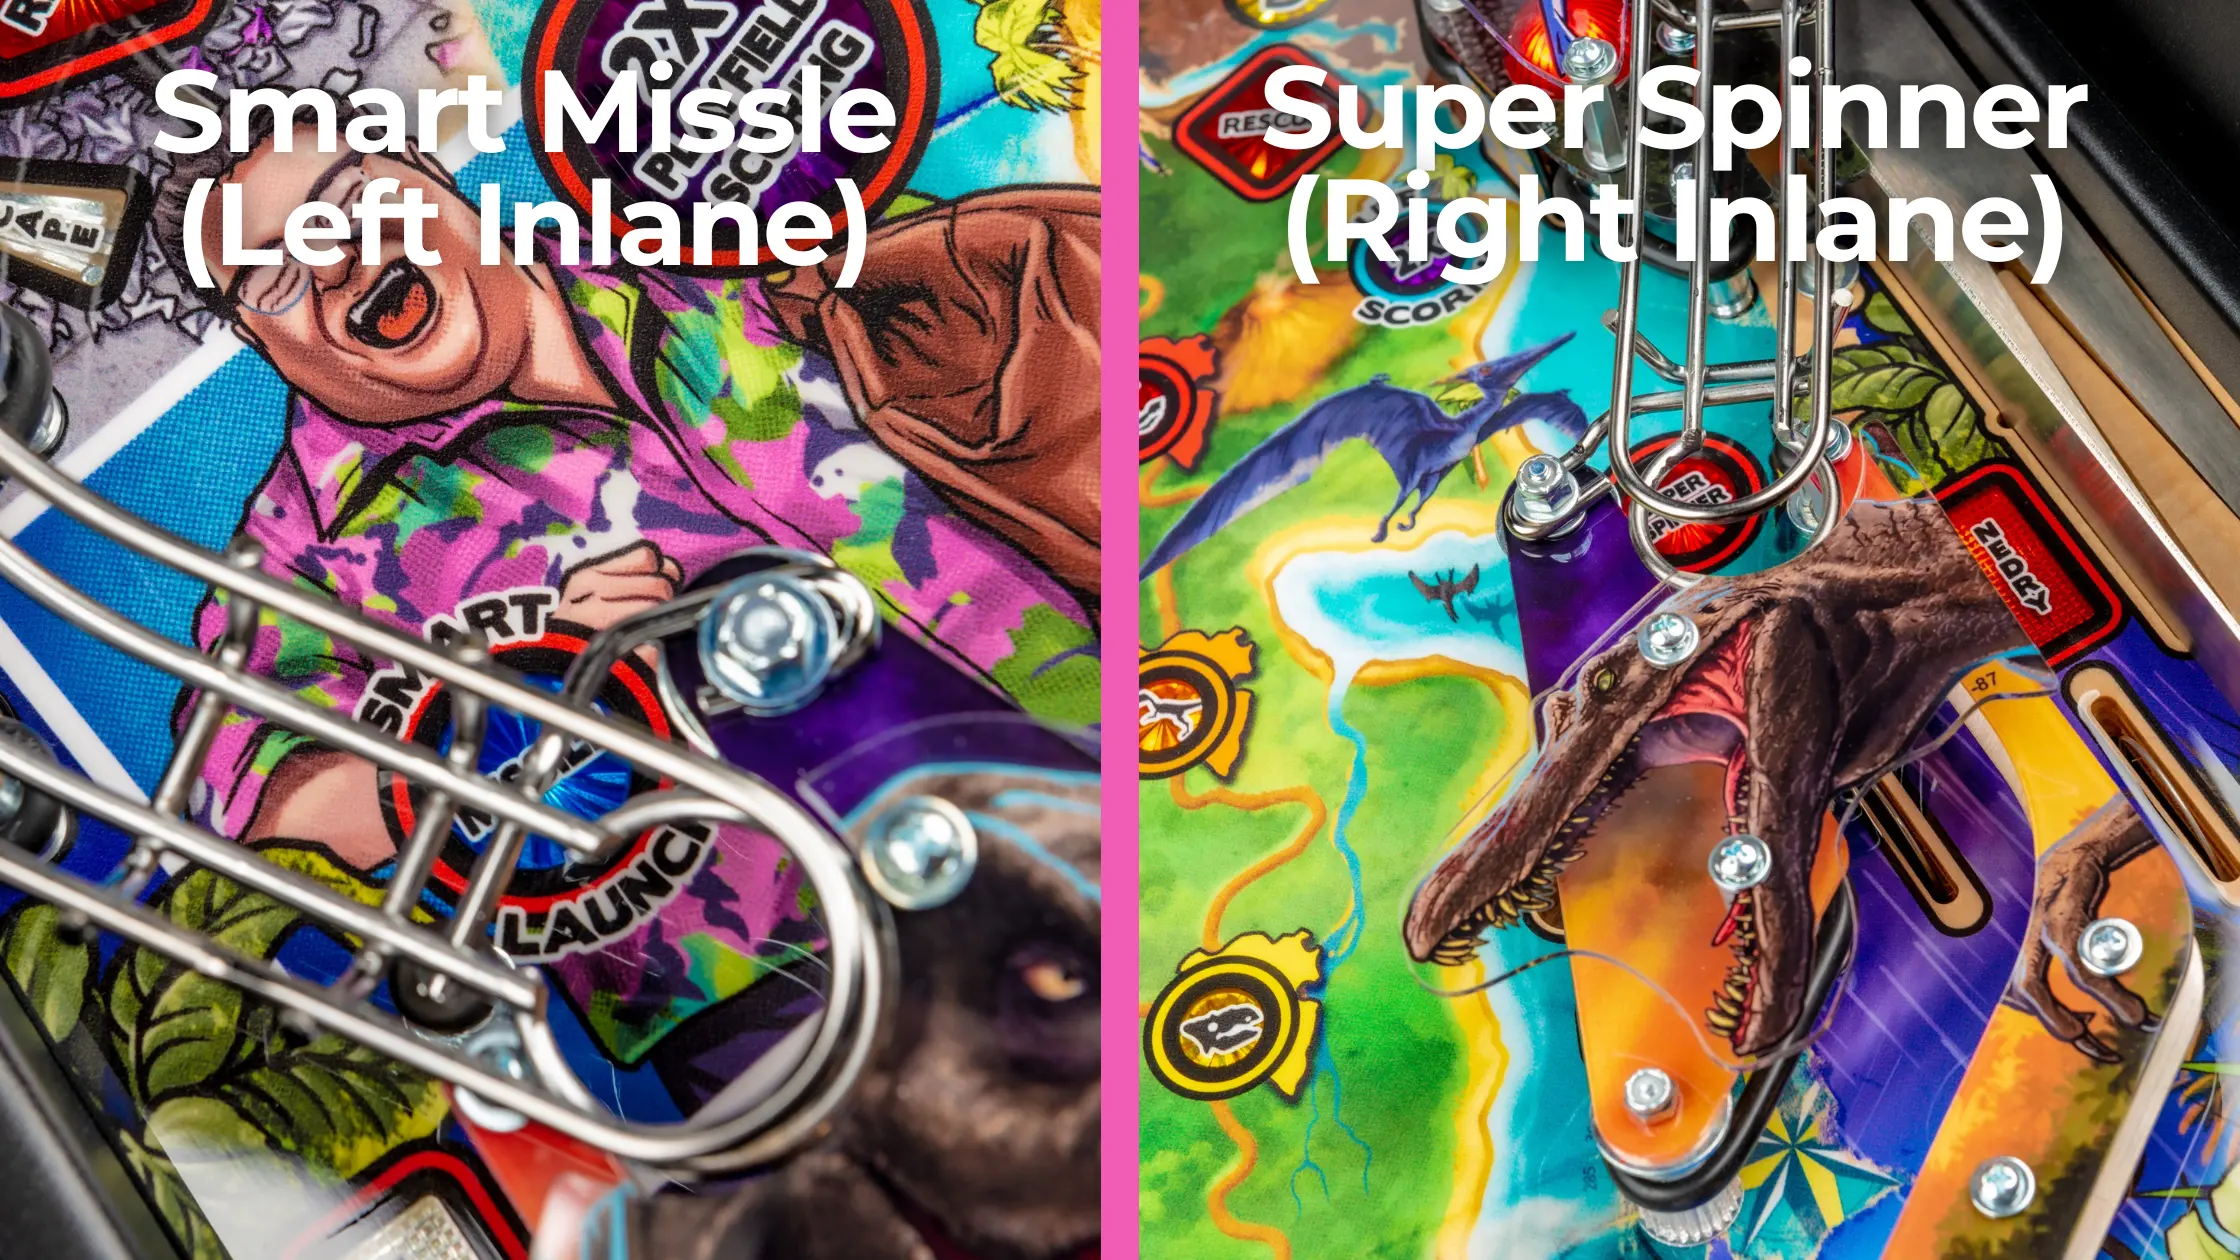
Collecting enough rescues (3, then 8, then every 4 rescues thereafter) lights the two inlanes for valuable awards that can be toggled by hitting the truck.
If the truck is facing the left side of the playfield, super spinner will be lit at the right inlane. Super spinner multiplies all spins by the player’s bonus multiplier (raised by capturing T-Rex or Spinosaurus, or after enough rescues) for a limited time. The base spinner value can be raised by shots to the game’s four ramps, but the increased spinner value only applies for one spinner rip, so make the most out of that one rip.
The more valuable of the two inlane awards to me – but also by far the more difficult to execute - is the smart missile that can be awarded at the left inlane when the truck is facing the right side. The ball will be held at the left inlane and the player will be prompted to use the action button to select an award, seen at the bottom of the display. When time expires, the player must hit the amber mine target between the bumpers to collect the award along with an increasing bonus score for nailing the smart missile shot. Try aiming for the second ball behind the truck to maximize your chances of winning it all.
In my experience, the best awards from the smart missile are dependent on what’s currently active in the game. If I’m currently in a paddock and close to the end, or not in a paddock, I will prioritize either “+5 Rescues” or “Raptor Multiball,” the third and fourth awards in the button sequence respectively. If I start a paddock on the same shot that activates the smart missile, or I somehow wind up in the T-Rex or Spinosaurus paddock, I will always take “Clear Paddock” – the second award in the sequence, clearing out the entire paddock of employees and its dinosaur in one satisfying shot.
There are three modes that can be started from the “C” target when control room is lit, and four different ways to qualify the control room:
Listed in appearance from left to right, the three modes are:
My order of preference: System Boot > Restore Power > Virus Attack
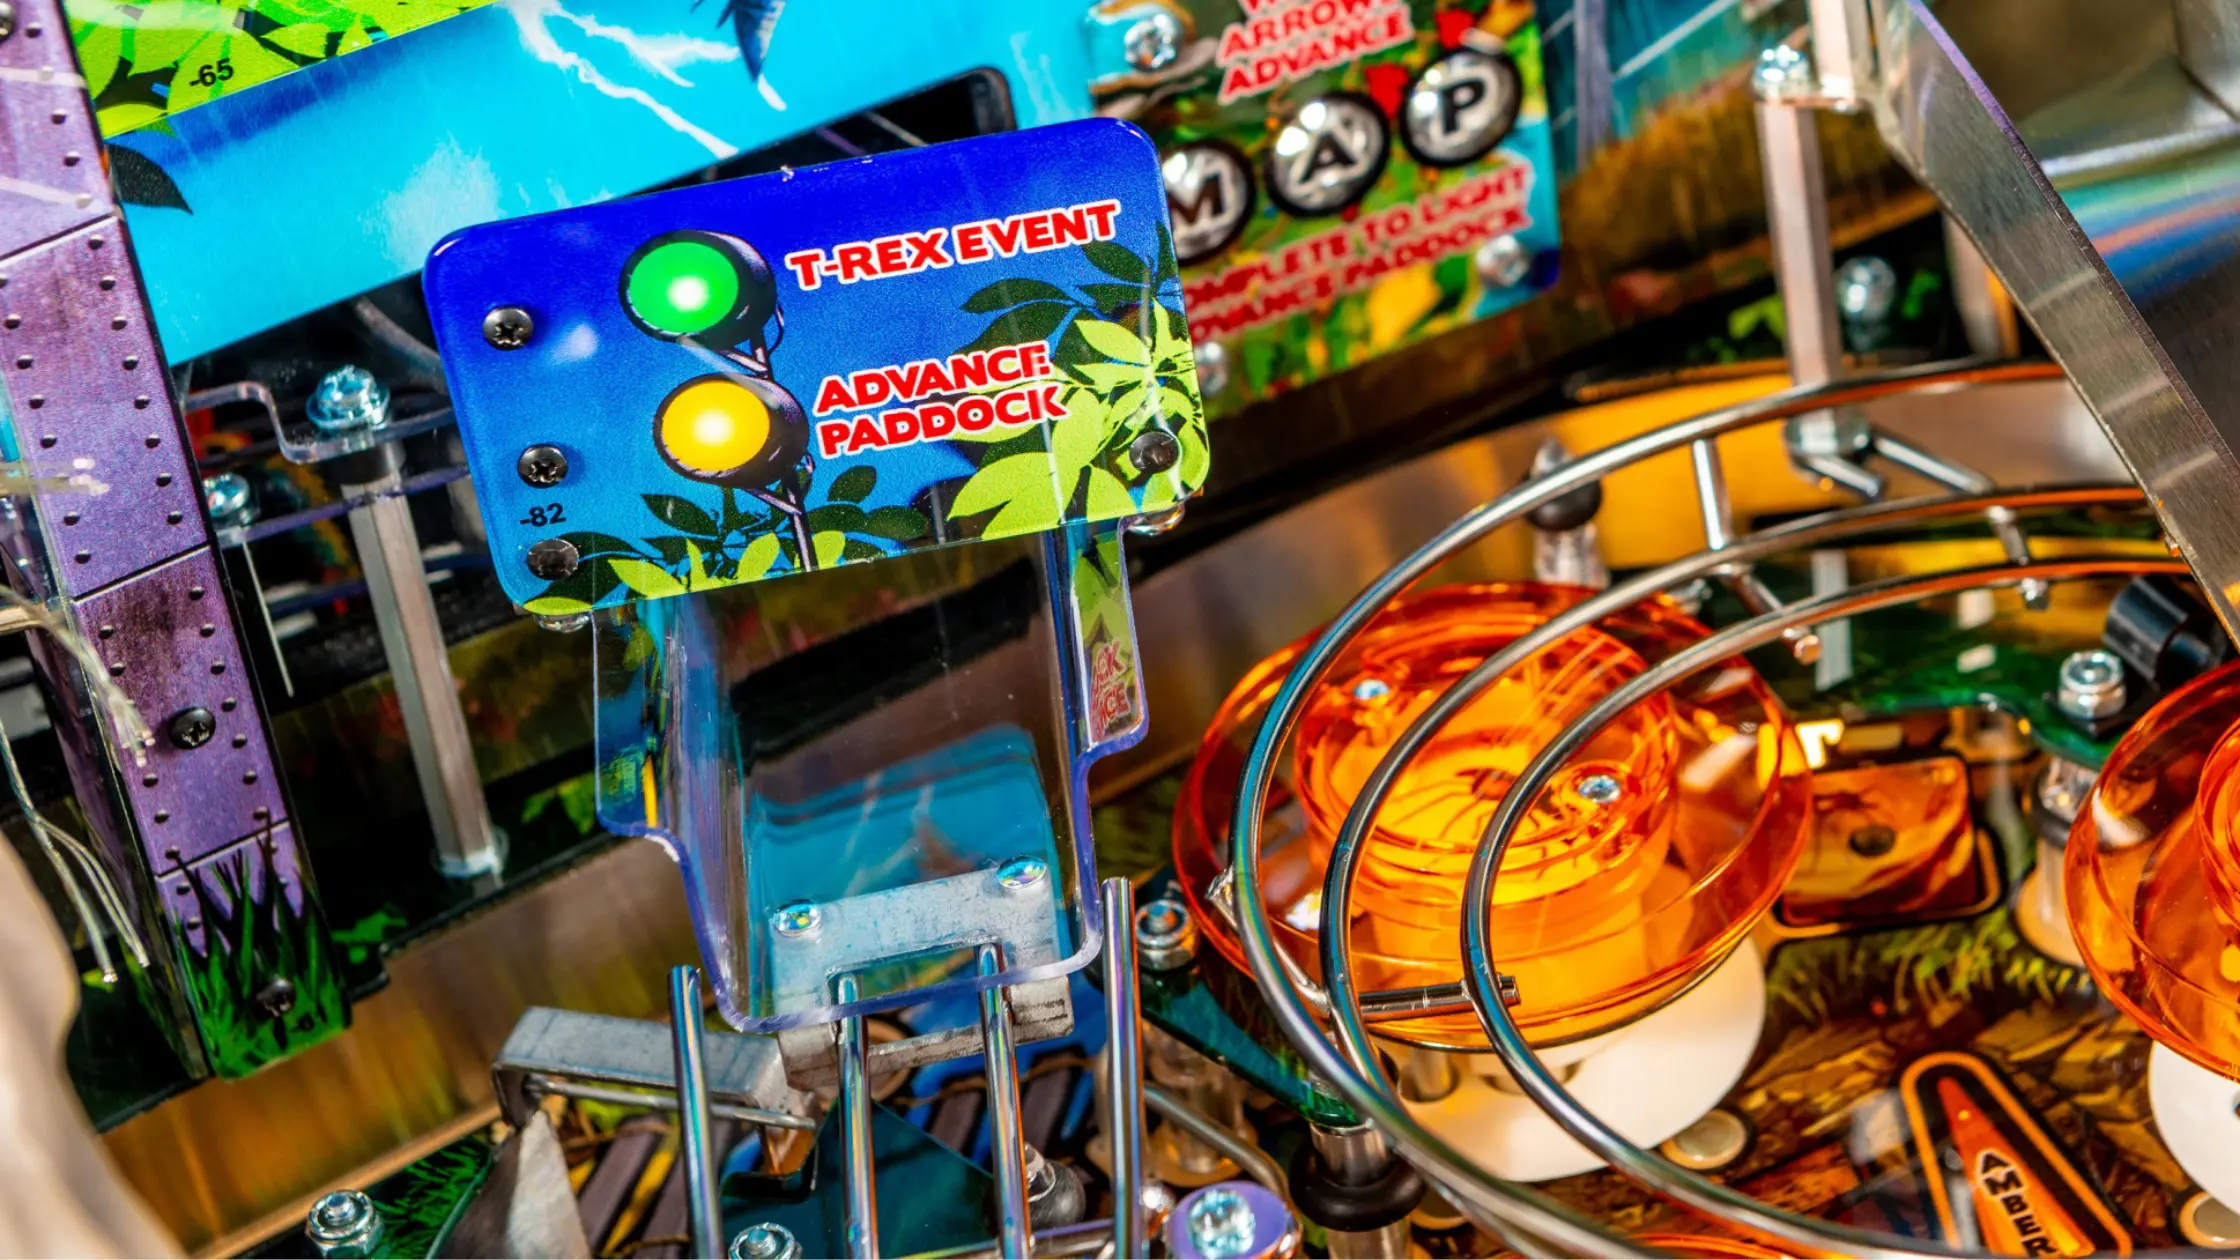
Shooting the truck advances the letters in T-REX. Once the name is completed, either Feed T-Rex hurry-up will start, or the left ramp will light for T-Rex Event if the hurry-up has already been played.
Feed T-Rex is a quick way to get a multiball going, and the multiball itself can be worth a sizable amount of points if played well. The hurry-up starts as soon as T-REX has been spelled, is scored at the left ramp, and increases by hitting the other orange shots around the playfield.
T-Rex Multiball starts after the hurry-up is scored and uses the hurry-up as the jackpot value. Jackpots are lit at the five shots that normally score CHAOS letters and can be hit in any order, but if you’re looking for truly massive scores, try hitting the jackpots in order from left to right. This will maintain a multiplier that drastically increases the super jackpot at the left ramp after all five jackpots are scored. Try ski passing out of the left ramp when the mode starts and making a beeline for the “C” target to score the first jackpot.
After T-Rex Multiball, T-Rex Events can be qualified at the left ramp in the same way, and later require full turns of the truck rather than partial hits. The lit event can be changed with full turns of the truck, and listed in order (from first to last), the three event modes are:
My order of preference: Rampage > Encounter > Chase
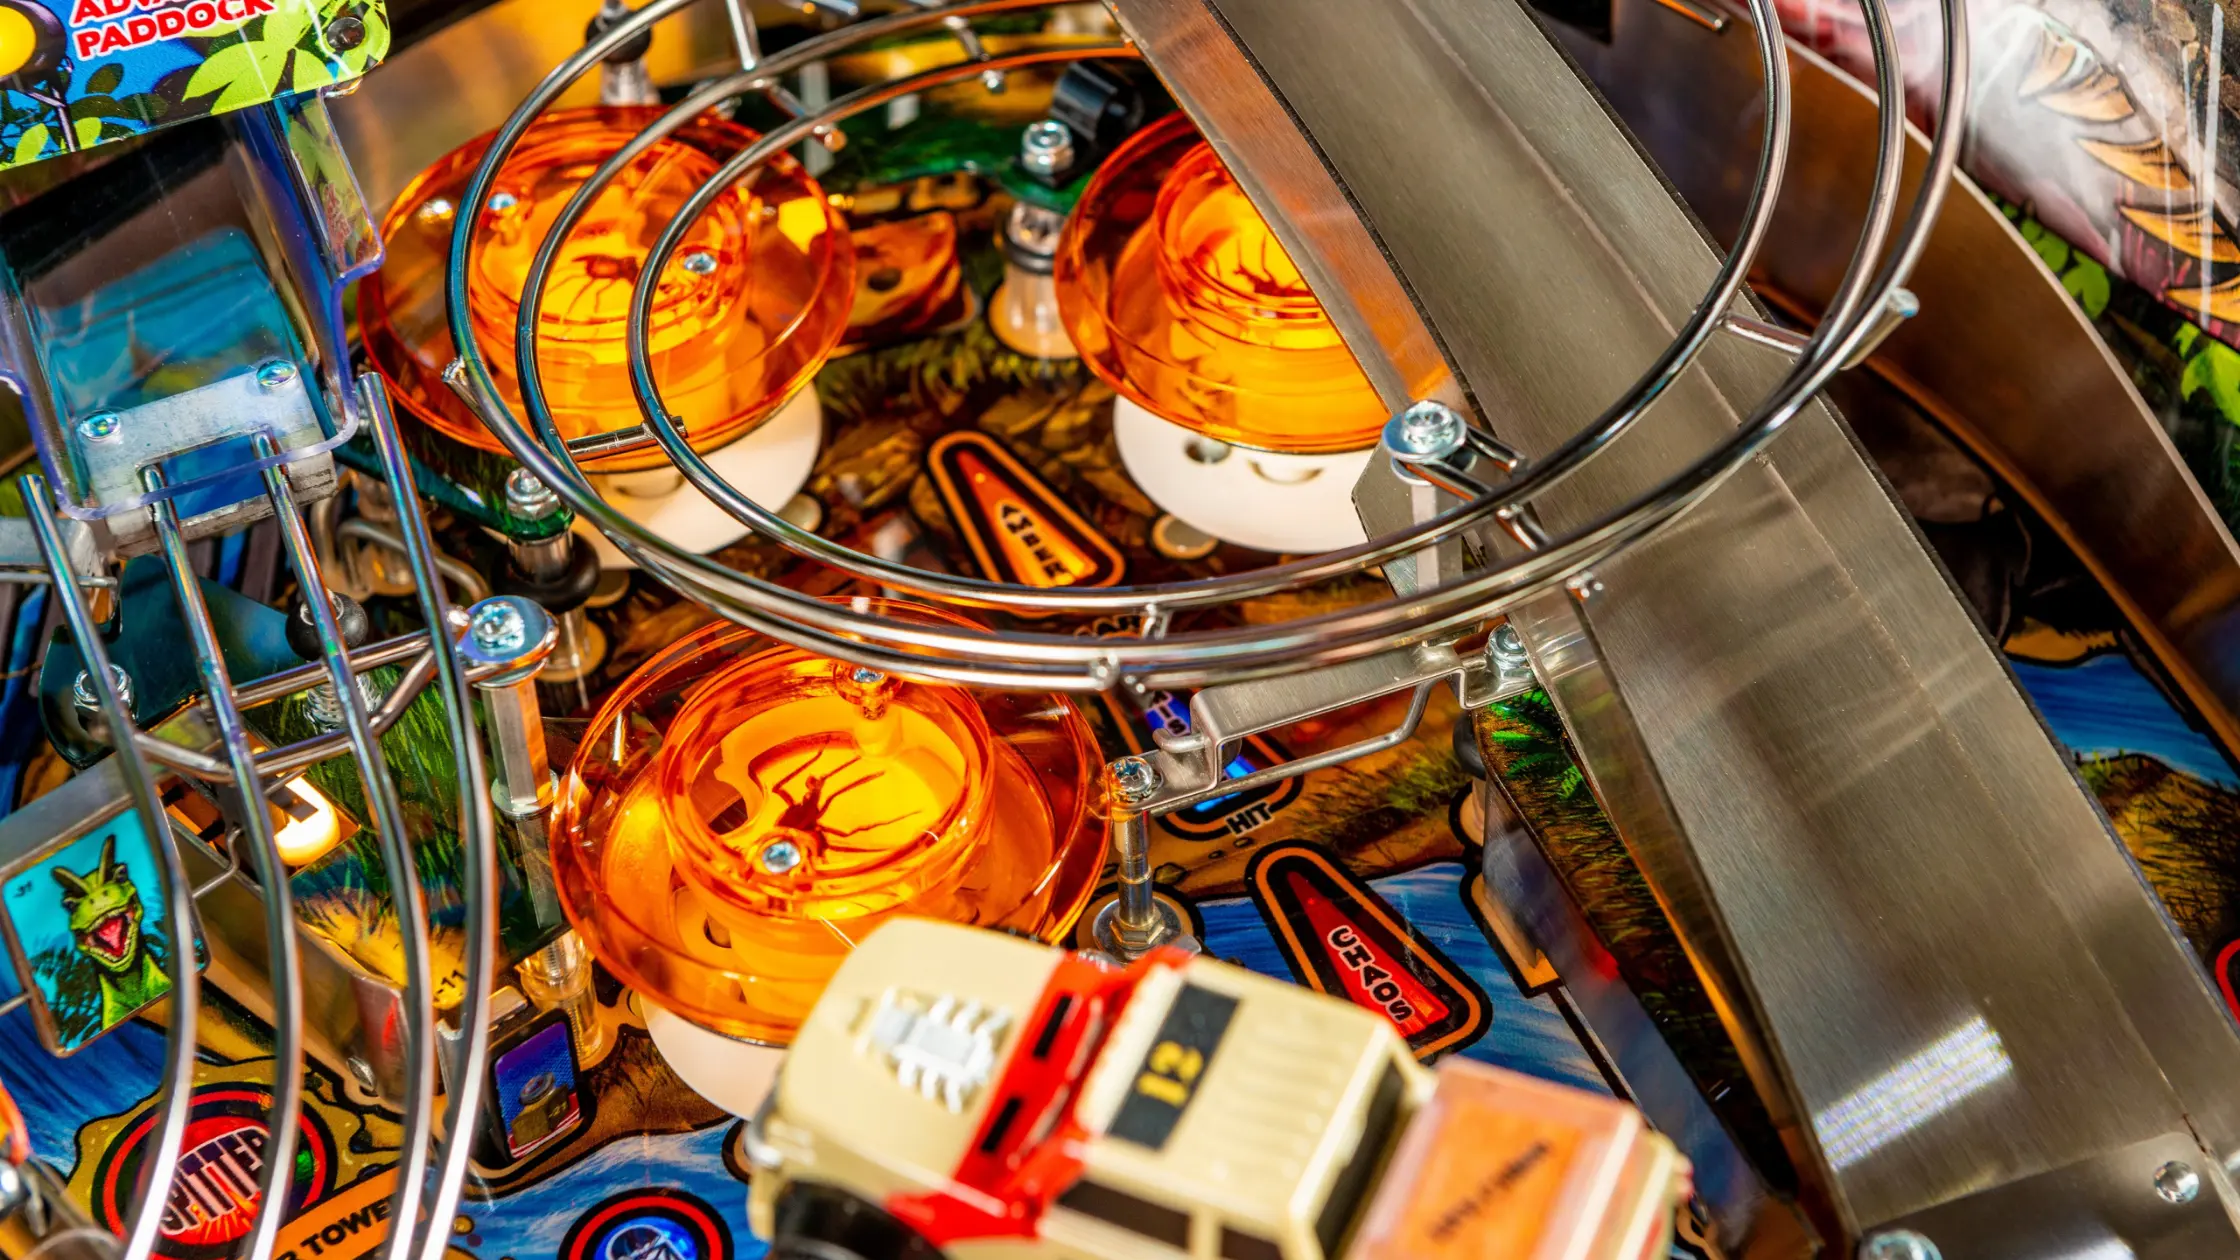
There are five shots marked with CHAOS letters around the playfield: the “C” target, left ramp, right ramp, “O” shot, and helipad. Hitting these in order, from left to right, lights the amber mine target between the bumpers for chaos multiball. The “C” target and “O” shot tend to be stumbling blocks for myself and other players; I like aiming for the “C” target at the very start of the game, but the “O” shot can be quite troublesome. Remember to hit the “O” shot from a cradle rather than on the fly and use the upper flipper as a guide into the shot.
Chaos multiball is generally best used as a utility multiball to help with completing paddocks or control room / T-Rex modes, though the jackpots can be worth quite a bit if you make it far into the multiball. All shots on either the left or right side of the playfield (depending on where the truck is facing) score jackpots, and super / letter jackpots can be scored at the amber mine target after enough normal jackpots are scored. Each letter jackpot also sends the ball to the bumpers, where balls can be added to the multiball after enough hits.
If you manage to make it through all five letter jackpots, the five shots in CHAOS will relight again to score the values that were set during the first part of the multiball. Collecting all five letters here will light the amber mine target for one last hurry-up worth their combined value – doubled if the truck is in the way of the target!
As mentioned, chaos multiball is best used as a utility multiball, but it can also be used to advance towards awards like tower combos (upper loop to tower ramp) or collect and start the super supply drop awards / amber modes given after enough loops.
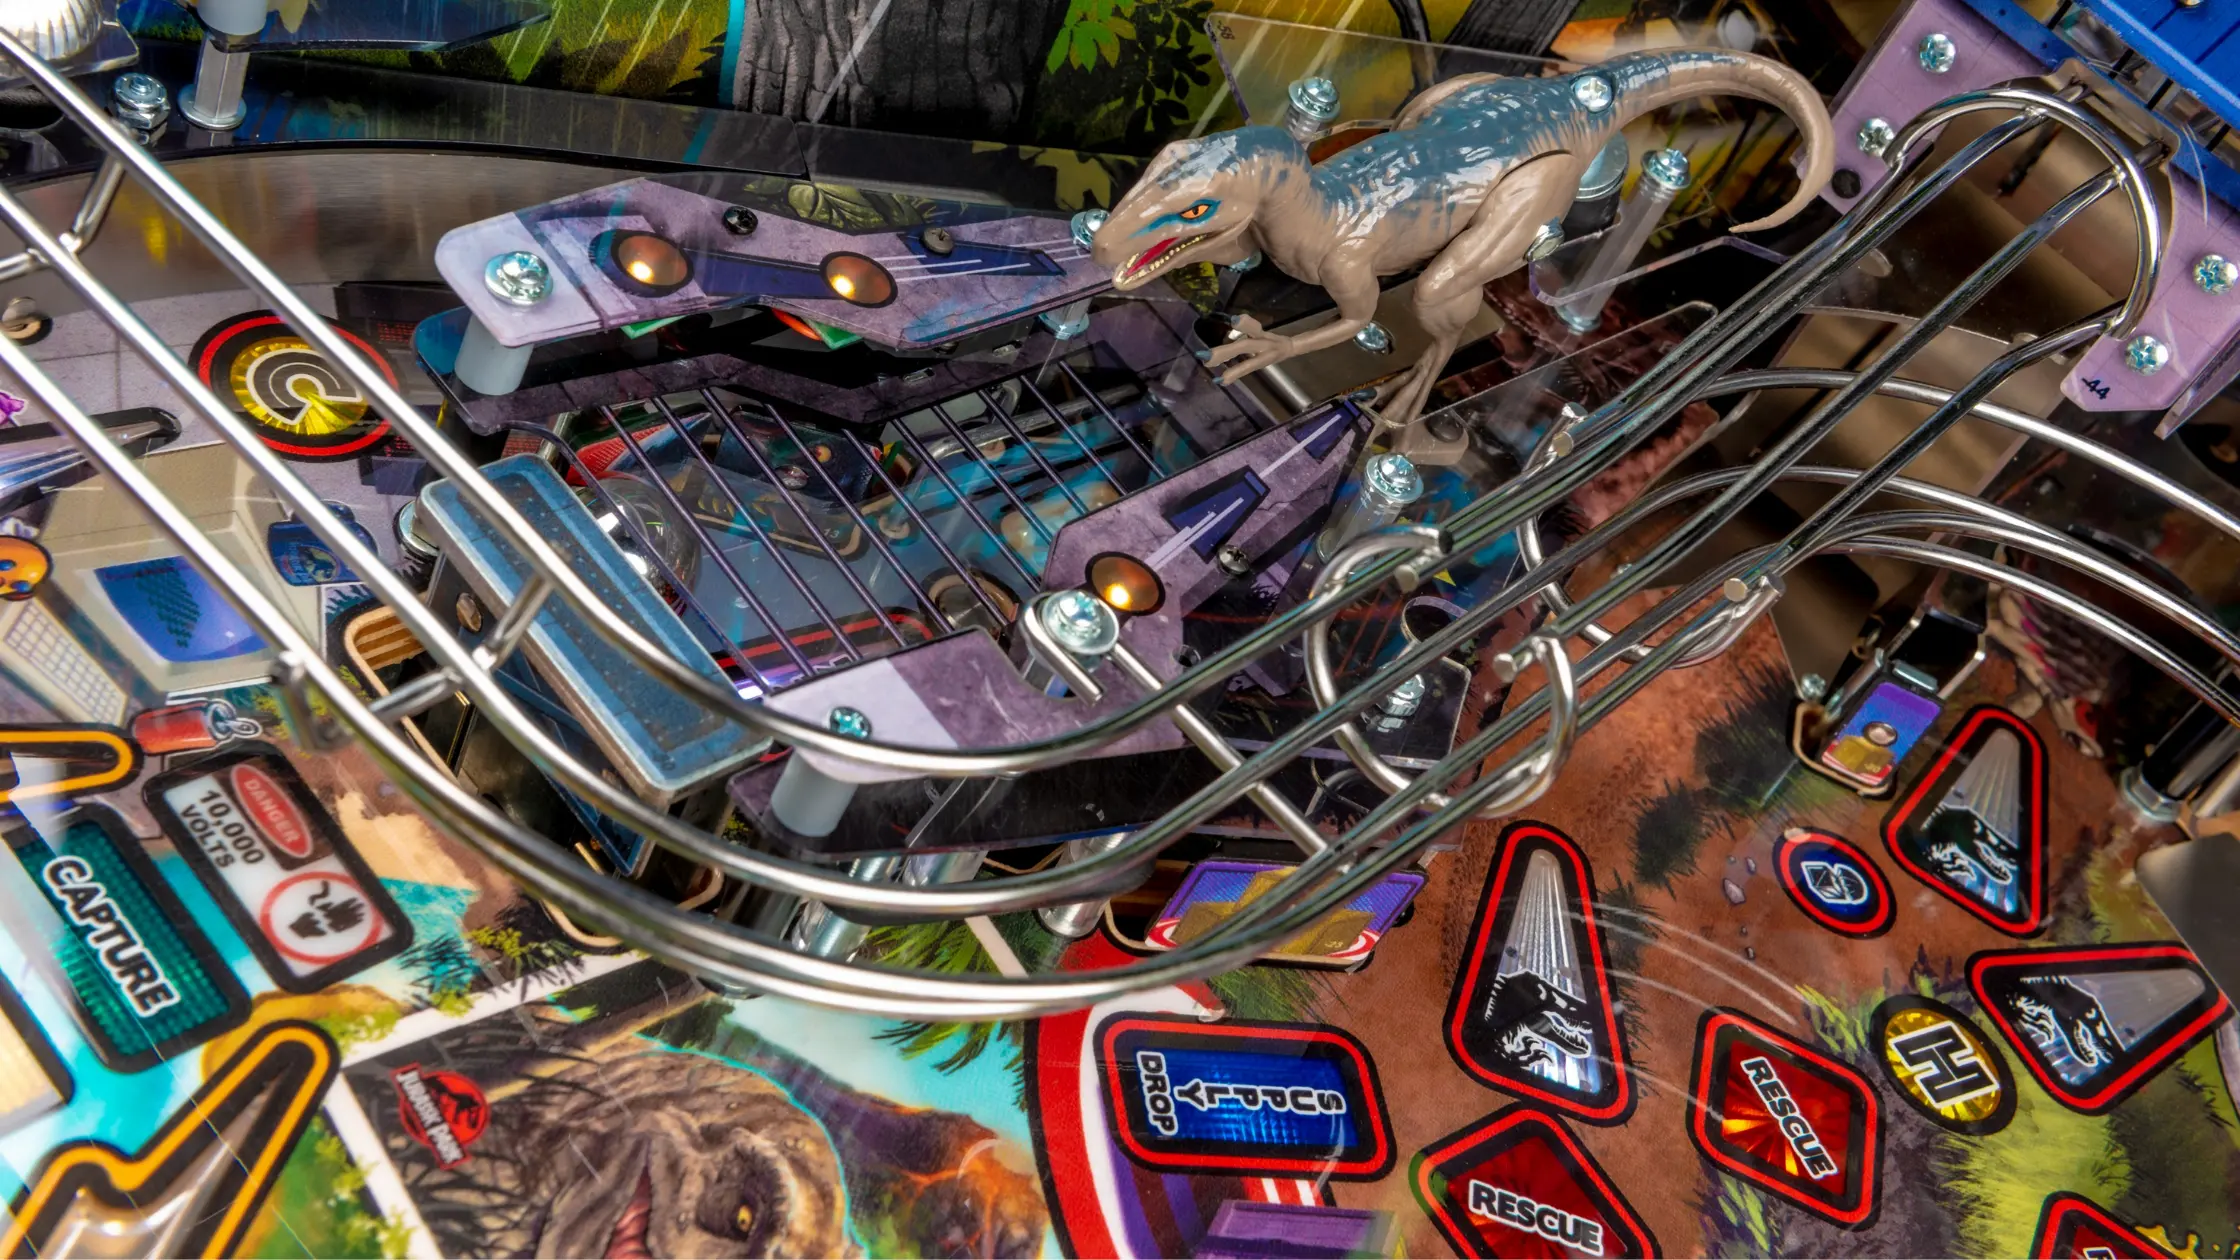
Hit the targets in the raptor pen enough times to light the center target for raptor capture, requiring a dead-on shot that’s best hit as a backhand from the left flipper on some copies. Once the raptor has been captured, keep hitting the raptor pen to lower the integrity of the electric fence. After about five hits, one more shot to the center target will start Raptor tri-ball.
Like the name implies, this multiball is a throwback to the multiball from the original Data East machine and can be worth a ton of points similarly to it. The multiball starts with the left ramp and right ramp lit to score raptor jackpots, built up with switch hits, and the second jackpot will always be 2x the value of the first.
After scoring both jackpots, hit the five letters in CHAOS to score smaller jackpots. Once CHAOS has been completed during the multiball, 6-ball play will commence! Hit the right ramp and upper loop as quickly as possible to score super jackpots multiplied by the number of balls in play, with the second super jackpot worth 2x the value of the first! Victory laps can then be scored at the CHAOS shots and relit by hitting the raptor pen for the remainder of the multiball.
Raptor tri-ball might be tough to start, especially on the Pro, but is well worth mastering as max value super jackpots can outweigh even the best played modes. Nail the two jackpots at the start as early as possible before tackling the CHAOS jackpots, as usual prioritizing the “C” target and “O” shot. If the multiball starts to look dire, remember that you can always add a ball to it by hitting the lit supply drop target.

So you probably got to this section and are wondering why the scores on this table blow up so quickly (or wondering why this table is so complex, or why I put myself to writing this guide, all valid questions). The trick is that 2x scoring, used in the right circumstances, can be the deciding factor between a good and great game of Stern JP.
There are three purple targets around the machine. One is located between the upper loop and tower ramp, and the other two are the “set trap” targets that are hit during paddocks. Once all three have been hit, the large target beneath the tower ramp will be lit to score supply drop. Supply drop typically scores a mystery award, which is nice on its own and includes the typical add-a-ball during certain multiballs, but each lit supply drop also lights the bottom right target for 45 seconds of 2x scoring if it isn’t already lit.
Even more valuable are the amber modes that can be earned by upgrading the supply drop award into a super supply drop. Hitting the upper loop enough times qualifies one of these four modes as the next award from the lit supply drop target. Either the slingshots, targets, bumpers, or ramps are lit to score the currently built amber value for a limited time. Start one of these during a multiball and watch the scores fly!
2x scoring is best used during multiballs that include multiplied jackpots, like T-Rex or Raptor multiballs, or during control room modes or T-Rex events to maximize their value. Though the target angle can look quite deadly, all it takes is a late left flipper shot to start 2x scoring when you need it.
Pteranodon attack is a switch frenzy mode with inconsistency as wild as the dinosaur itself, at least in my experience. Started after hitting the right ramp four times, all switch hits add to a value that can be scored at the right ramp and multiplied at every threshold of 12 switch hits, though this multiplier resets when the ball drains or the award is collected at the right ramp.
While not worth going for on its own, pteranodon attack can be a nice bonus mode to have going during any multiball, especially if you’re dialed into the spinner and amber mine.
Both the left and right outlane have their own ball saves. As usual, though lighting the ball saves might be the least fun part of the game, they can be crucial to high scoring by keeping the ball in play – especially the escape ball save on the left outlane.
Escape is lit at the start of the game by default, but afterwards, it must be lit manually by first rolling through the switch above the bumper area and then hitting the “light escape” target on the very far left of the playfield. This target is best hit from a cradle rather than on the fly.
Nedry used to be a points award to mock the player for draining, but recently became a proper ball save. This ball save lights after hitting the 2x scoring target enough times – 3 for the first, 15 for the second, 30 for the third. Due to the many shots required to light Nedry, it is not advised to go for lighting it intentionally, as opposed to the ease of lighting escape at the left outlane.
Both outlanes can also be lit from the smart missile as the default award, but I prioritize other smart missile awards over it.


No comments yet. Sign in to be the first.